|
Android 6 Tutorial 第六堂(2)Material Design – RecylerView << 前情
Android 5 Lollipop開始提供的Material Design,除了新增RecylerView與其它許多新的元件,也有許多改良與簡化的動畫API,例如之前說明的Transition API。目前記事應用程式提供記錄照片的功能,使用者在主畫面選擇記事資料以後,照片會直接顯示在記事資料的畫面:

把照片直接顯示在記事資料畫面的作法,會佔用畫面大部份的空間。如果使用者為記事資料儲存照片的話,進入記事資料以後,改為在畫面右下角顯示照片的縮圖:
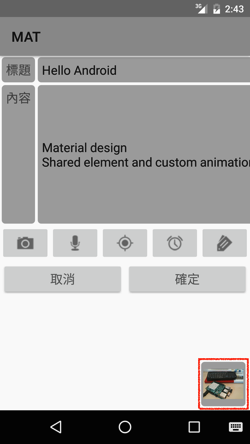
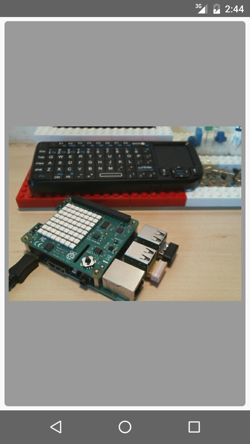
使用者如果需要檢視照片,點選右下角的照片縮圖以後,才會使用整個畫面顯示照片:
這一章把記事資料的照片顯示,改為上面說明的作法,在顯示照片的時候,採用Android 5 Lollipop、API Level 21開始提供的「Shared element」,執行顯示圖片時的畫面轉換效果,更符合Material Design的設計概念。
20-1 建立顯示照片元件
要完成上面說明的修正,需要另外建立一個顯示照片Activity元件,這個元件的設計會比較簡單一些。
依照下列的步驟,建立這個元件的畫面配置資源:
- 在「res/layout」目錄按滑鼠右鍵。
- 選擇「New -> Layout Resource File」。
- 在File Name:欄位輸入「activity_picture」。
- 選擇「OK」按鈕。
參考下列的內容完成這個畫面配置資源:
<!-- 使用 android:transitionName 設定 shared element 名稱 -->
<ImageView xmlns:android="http://schemas.android.com/apk/res/android"
    android:id="@+id/picture_view"
    android:layout_width="match_parent"
    android:layout_height="match_parent"
    android:background="@drawable/rectangle_drawable"
    android:padding="6sp"
    android:layout_margin="6sp"
    android:transitionName="picture"
    android:onClick="clickPicture"/>
依照下列的步驟,建立這個元件的Activity類別:
- 在應用程式主套件目錄按滑鼠右鍵。
- 選擇「New -> Java Class」。
- 在Name:輸入「PictureActivity」。
- 選擇「OK」按鈕。
參考下列的內容完成這個Activity類別:
package net.macdidi.myandroidtutorial;

import android.app.Activity;
import android.content.Intent;
import android.os.Build;
import android.os.Bundle;
import android.view.View;
import android.view.Window;
import android.widget.ImageView;

public class PictureActivity extends Activity {

    @Override
    protected void onCreate(Bundle savedInstanceState) {
        super.onCreate(savedInstanceState);
        requestWindowFeature(Window.FEATURE_NO_TITLE);
        setContentView(R.layout.activity_picture);

        // 取得照片元件
        ImageView picture_view = (ImageView) findViewById(R.id.picture_view);

        // 讀取照片檔案名稱
        Intent intent = getIntent();
        String pictureName = intent.getStringExtra("pictureName");

        if (pictureName != null) {
            // 設定照片元件
            FileUtil.fileToImageView(pictureName, picture_view);
        }
    }

    public void clickPicture(View view) {
        // 如果裝置的版本是LOLLIPOP
        if (Build.VERSION.SDK_INT >= Build.VERSION_CODES.LOLLIPOP) {
            finishAfterTransition();
        }
        else {
            finish();
        }
    }

}
開啟AndroidManifest.xml設定檔,參考下列的內容加入元件的設定:
<?xml version="1.0" encoding="utf-8"?>
<manifest xmlns:android="http://schemas.android.com/apk/res/android"
    package="net.macdidi.myandroidtutorial" >

    ...

    <application
        android:allowBackup="true"
        android:icon="@drawable/ic_launcher"
        android:label="@string/app_name"
        android:theme="@style/AppTheme" >
        ...

        <!-- 檢視照片元件 -->
        <activity android:name=".PictureActivity" />
    </application>

</manifest>
完成照片檢視元件的設計,它跟一般Activity元件的設計差不多,只有在畫面配置資源的部份,為顯示照片的ImageView元件加入特別的設定,這是為了設定轉換效果加入的「android:transitionName」,在後面完成所有修改後,就可以產生畫面轉換的效果。
20-2 修改記事資料元件
接下來修改記事資料元件的部份。開啟記事元件的畫面資源「res/layout/activity_item.xml」,參考下列的片段,依照註解的說明執行需要的修改:
<?xml version="1.0" encoding="utf-8"?>

<!-- 加入外層的 RelativeLayout 設定 -->
<RelativeLayout xmlns:android="http://schemas.android.com/apk/res/android"
    xmlns:tools="http://schemas.android.com/tools"
    android:layout_width="match_parent"
    android:layout_height="match_parent"
    tools:context="net.macdidi.myandroidtutorial.ItemActivity">

    <!-- 移除 xmlns:android 與 tools:context 設定 -->
    <ScrollView
        android:layout_width="match_parent"
        android:layout_height="match_parent">

        <TableLayout
            xmlns:tools="http://schemas.android.com/tools"
            android:layout_width="match_parent"
            android:layout_height="match_parent"
            android:stretchColumns="1"
            tools:context="net.macdidi.myandroidtutorial.ItemActivity">

            ...

            <!-- 移除原來顯示圖片的設定
            <ImageView
                android:id="@+id/picture"
                android:layout_width="match_parent"
                android:layout_height="wrap_content"
                android:background="@drawable/retangle_drawable"
                android:padding="6sp"
                android:layout_margin="2sp"
                android:visibility="invisible" />
            -->

            <TableLayout
                android:layout_width="match_parent"
                android:layout_height="wrap_content"
                android:stretchColumns="*">
                ...
            </TableLayout>

            <TableLayout
                android:layout_width="match_parent"
                android:layout_height="wrap_content"
                android:stretchColumns="*">
                ...
            </TableLayout>
        </TableLayout>

    </ScrollView>

    <!-- 在右下角顯示照片縮圖 -->
    <!-- 使用 android:transitionName 設定 shared element 名稱 -->
    <ImageView
        android:id="@+id/picture"
        android:layout_width="64sp"
        android:layout_height="64sp"
        android:layout_alignParentBottom="true"
        android:layout_alignParentRight="true"
        android:background="@drawable/rectangle_drawable"
        android:padding="3sp"
        android:layout_margin="6sp"
        android:visibility="invisible"
        android:transitionName="picture"
        android:onClick="clickPicture"/>

<!-- 最外層的 RelativeLayout 結束標籤 -->
</RelativeLayout>
開啟記事資料Activity元件類別「ItemActivity.java」,加入下列的方法宣告:
// 點擊畫面右下角的照片縮圖元件
public void clickPicture(View view) {
    Intent intent = new Intent(this, PictureActivity.class);

    // 設定圖片檔案名稱
    intent.putExtra("pictureName", configFileName("P", ".jpg").getAbsolutePath());

    // 如果裝置的版本是LOLLIPOP
    if (Build.VERSION.SDK_INT >= Build.VERSION_CODES.LOLLIPOP) {
        ActivityOptions options = ActivityOptions
                .makeSceneTransitionAnimation(this, picture, "picture");
        startActivity(intent, options.toBundle());
    }
    else {
        startActivity(intent);
    }
}
執行這個應用程式,選擇記事資料後,為它拍攝與儲存一張照片,然後再執行檢視照片的操作,試試看動畫的效果。
20-3 設計Floating Action Button
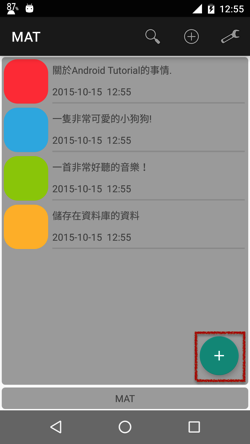
以這個記事應用程式來說,新增記事資料應該是經常操作的功能,目前使用者經由ActionBar提供的新增選單執行新增記事的工作。應用程式經常需要執行的功能,可以考慮使用Floating Action Button(FAB)提供使用者比較方便的操作,它通常會停留在畫面的右下角,點選它就可以啟動新增記事元件:
Android Design Support Library從Android 6開始提供,它包含許多好用的套件,Floating action button包含在這個套件,在專案中使用Android Support Library必須加入相關的設定。開啟「Gradle Scripts -> build.gradle(Module: app)」,參考下列的說明加入Android DesignSupport Library的設定,修改後選擇功能表「Tools -> Android 」:
dependencies {
    ...
    compile 'com.android.support:design:23.0.1'
}
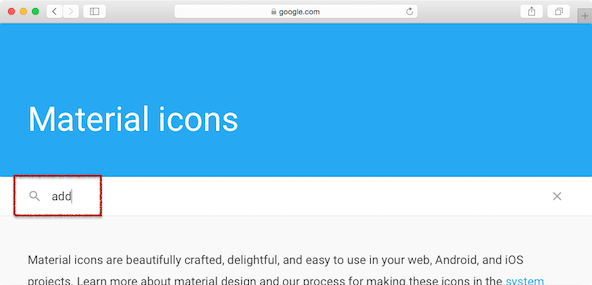
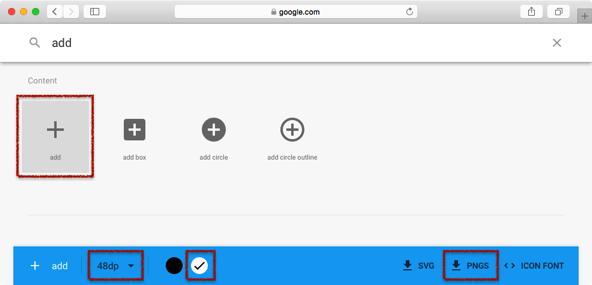
接下來準備Floating Action Button的新增圖示檔案,在瀏覽器開啟下列的網址:http://www.google.com/design/icons/。在搜尋欄位輸入「add」後按「Enter」鍵:
找到並選擇「add」圖示後,選擇「48dp」與白色,最後選擇「PNGS」下載與儲存圖示檔案:
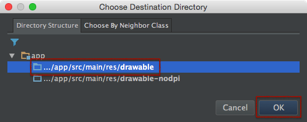
解壓縮下載的檔案以後,複製「解壓縮資料夾\android\drawable-xhdpi\icaddwhite_48dp.png」,在「res\drawable」目錄上按滑鼠右鍵,選擇「paste」,選擇「…/app/src/main/res/drawable」後選擇「OK」按鈕:
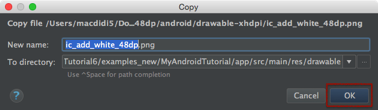
選擇「OK」按鈕完成複製檔案的工作:
開啟「res\layout\activity_main.xml」,修改為下列的內容:
<?xml version="1.0" encoding="utf-8"?>
<LinearLayout xmlns:android="http://schemas.android.com/apk/res/android"
    xmlns:tools="http://schemas.android.com/tools"
    android:layout_width="match_parent"
    android:layout_height="match_parent"
    android:orientation="vertical"
    tools:context=".MainActivity">

    <!-- 加入 RelativeLayout -->
    <RelativeLayout
        android:layout_width="match_parent"
        android:layout_height="0dp"
        android:layout_weight="1">

        <android.support.v7.widget.RecyclerView
            android:id="@+id/item_list"
            android:layout_width="match_parent"
            android:layout_height="match_parent"
            android:layout_margin="@dimen/default_margin"
            android:background="@drawable/rectangle_drawable"
            android:dividerHeight="1sp"
            android:scrollbars="vertical" />

        <!-- 新增 FloatingActionButton 元件-->
        <android.support.design.widget.FloatingActionButton
            android:layout_width="wrap_content"
            android:layout_height="wrap_content"
            android:layout_alignParentRight="true"
            android:layout_alignParentBottom="true"
            android:layout_margin="16dp"
            android:src="@drawable/ic_add_white_48dp"
            android:onClick="clickAdd"/>
    </RelativeLayout>

    <TextView
        android:id="@+id/show_app_name"
        android:layout_width="match_parent"
        android:layout_height="wrap_content"
        android:layout_margin="@dimen/default_margin"
        android:background="@drawable/rectangle_drawable"
        android:clickable="true"
        android:gravity="center"
        android:onClick="aboutApp"
        android:padding="@dimen/default_padding"
        android:text="@string/app_name" />

</LinearLayout>
開啟「res\values\styles.xml\styles.xml(v21)」,修改為下列的內容:
<?xml version="1.0" encoding="utf-8"?>
<resources>
    <!-- 把 android:Theme.Material.Light 改為 Theme.AppCompat.Light.DarkActionBar -->
    <style name="AppTheme" parent="Theme.AppCompat.Light.DarkActionBar">
        <item name="android:colorPrimary">#999999</item>
        <item name="android:navigationBarColor">#777777</item>

        <item name="android:windowContentTransitions">true</item>

        <item name="android:windowEnterTransition">@transition/explode_transition</item>
        <item name="android:windowExitTransition">@transition/explode_transition</item>
    </style>
</resources>
開啟「MainActivity」類別,加入下列的方法:
// 點擊新增按鈕
public void clickAdd(View view) {
    Intent intent = new Intent("net.macdidi.myandroidtutorial.ADD_ITEM");
    startActivityForVersion(intent, 0);
}
完成所有的工作了,執行這個應用程式,試試看這一章修改與新增的功能。因為目前已經採用Floating action button執行新增功能,所以你可以把功能表中的新增功能移除。這是示範的影片:
課程相關的檔案都可以GitHub瀏覽與下載。
 http://github.com/macdidi5/Android-6-Tutorial http://github.com/macdidi5/Android-6-Tutorial
|  Java 學習之路


omegawea
03/11萬分感謝您的細心指導.