 Java 學習之路
Delphi APP 開發入門(十二)MapView初探
|
Delphi APP 開發入門(十一)Microsoft Azure Translator實戰<<前情 之前文章中曾使用LocationSensor來做GPS定位,但美中不足是使用WebBrowser來顯示Google Map。但在Delphi XE8之後,就提供了原生的MapView來顯示地圖了!很久沒更新的Delphi APP開發入門就來談談最新的MapView好了!不到十個步驟就可以完成一支即時顯示目前位置在地圖上的程式。 首先新增一個空白的multi-device專案,然後在畫面上放在一個MapView元件以及一個LocationSensor元件(如下圖)。
接著在Form1的Show事件加上以下程式 procedure TForm1.FormShow(Sender: TObject); begin // 初始化地圖 MapView1.Location := TMapCoordinate.Create(59.965, 30.35); MapView1.Zoom := 10; locationsensor1.Active := true; end; 接著在LocationSensor的LocationChanged事件加上 procedure TForm1.LocationSensor1LocationChanged(Sender: TObject; const OldLocation, NewLocation: TLocationCoord2D); var MyMarker: TMapMarkerDescriptor; begin // 以目前位置建立地圖圖標 MyMarker := TMapMarkerDescriptor.Create(Tmapcoordinate.Create(Newlocation.Latitude,Newlocation.Longitude), 'MyMarker'); MyMarker.Draggable := True; MyMarker.Visible :=True; MapView1.Location := Tmapcoordinate.Create(Newlocation.Latitude,Newlocation.Longitude); MapView1.Zoom := 20; end; 我們就完成了程式!部屬到iOS裝置很簡單,只要直接Run就行了~如果是Android的話還需要幾個步驟。
3 將API金貼到Options→Version Info的APIkey
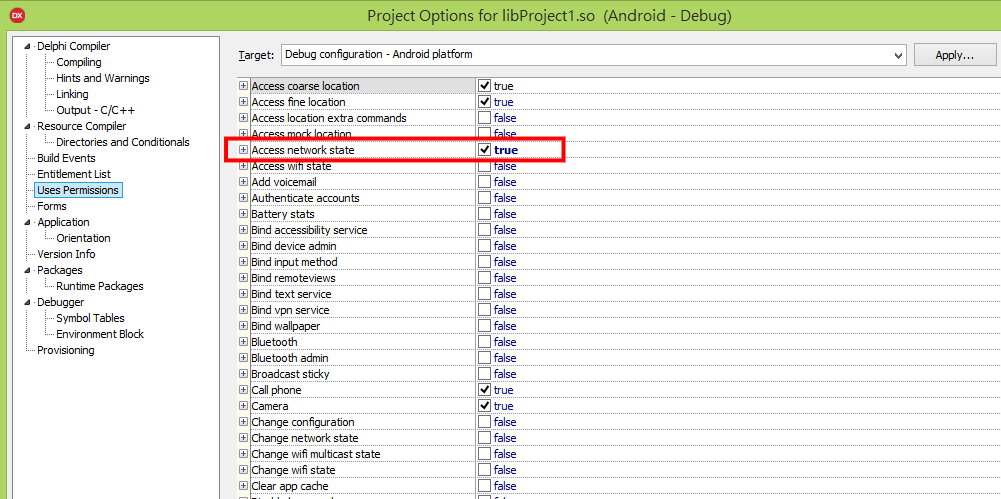
4 Uses Permissions中的Access network state打開 5 Entitlement List打開Maps Service
6 執行畫面如下 iOS畫面
Android版本
|


![Screenshot_2016-03-29-17-52-15[1]](https://www.codedata.com.tw/wp-content/uploads/2016/03/Screenshot_2016-03-29-17-52-151.png)
相關文章
關於作者


本名林壽山,目前為自由開發者,也喜歡研究易經、奇門遁甲,從事資料庫程式設計、網頁設計、餐飲POS系統開發、iOS Swift行動裝置開發。使用Delphi 16年的7年級前段班生,致力於學習新的事物,希望讓更多人踏入寫程式的不歸路。近期在學校的產業學院講師,主要為PHP Laravel/Codeigniter的網站開發教學教育訓練,希望讓產業跟學術更加無縫接軌。 電子郵件: [email protected] 林壽山的部落格