 Java 學習之路
Python Tutorial 第五堂(1)使用模版系統
|
Python Tutorial 第四堂(3)撰寫 Django 中第一個 View?<< 前情 在 Python Tutorial 第四堂(3) 中,我們在 概念上
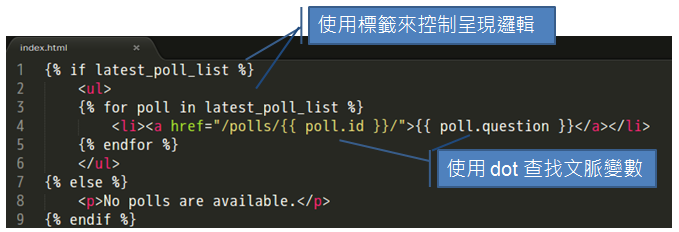
練習 12:撰寫模版在你的 polls 目錄中建立一個 templates 目錄,Django 會在這個目錄中尋找模版,在 templates 目錄中建立另一個名為 polls 的目錄,並在其中建立一個名為 index.html 的檔案。 也就是說,現在你建立了一個模版檔案 polls/templates/polls/index.html,接著將以下的程式碼放入模版之中: {% if latest_poll_list %}
<ul>
{% for poll in latest_poll_list %}
<li><a href="/polls/{{ poll.id }}/">{{ poll.question }}</a></li>
{% endfor %}
</ul>
{% else %}
<p>No polls are available.</p>
{% endif %}
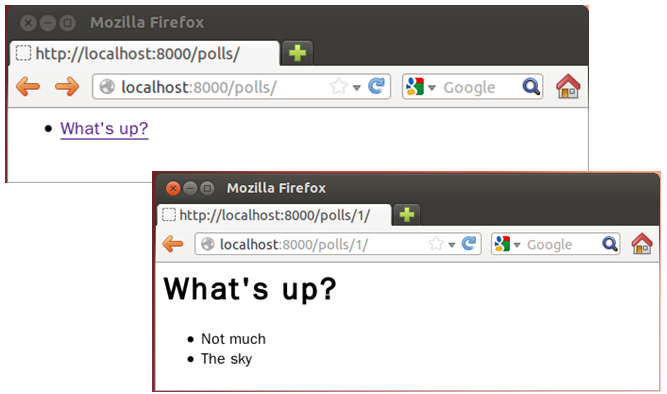
接著再建立一個名為 detail.html 的檔案,並撰寫以下的程式碼: <h1>{{ poll.question }}</h1>
<ul>
{% for choice in poll.choice_set.all %}
<li>{{ choice.choice_text }}</li>
{% endfor %}
</ul>
開啟 polls/views.py,並修改 from django.shortcuts import render
from polls.models import Poll
from django.http import Http404
def index(request):
latest_poll_list = Poll.objects.all().order_by('-pub_date')[:5]
context = {'latest_poll_list': latest_poll_list}
return render(request, 'polls/index.html', context)
def detail(request, poll_id):
try:
poll = Poll.objects.get(pk=poll_id)
except Poll.DoesNotExist:
raise Http404 # 產生 404 回應
return render(request, 'polls/detail.html', {'poll': poll})
其中 接著使用 from polls.models import Poll, Choice from django.utils import timezone p = Poll(question="What's up?", pub_date=timezone.now()) p.save() p.choice_set.create(choice_text='Not much', votes=0) p.choice_set.create(choice_text='The sky', votes=0) 執行
在這個練習當中使用的 from django.http import HttpResponse
from django.template import Context, loader
from polls.models import Poll
def index(request):
latest_poll_list = Poll.objects.order_by('-pub_date')[:5]
template = loader.get_template('polls/index.html')
context = Context({
'latest_poll_list': latest_poll_list,
})
return HttpResponse(template.render(context))
你可以看到,Django 最後需要的是 實際上,這個練習中的 from django.http import Http404
# ...
def detail(request, poll_id):
try:
poll = Poll.objects.get(pk=poll_id)
except Poll.DoesNotExist:
raise Http404
return render(request, 'polls/detail.html', {'poll': poll})
也可以用一個簡便的函式 from django.shortcuts import render, get_object_or_404
# ...
def detail(request, poll_id):
poll = get_object_or_404(Poll, pk=poll_id)
return render(request, 'polls/detail.html', {'poll': poll})
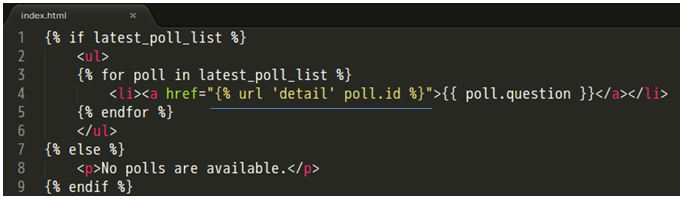
回頭看一下模版檔案 index.html 中超鏈結部份的內容: ...
{% for poll in latest_poll_list %}
<li><a href="/polls/{{ poll.id }}/">{{ poll.question }}</a></li>
{% endfor %}
...
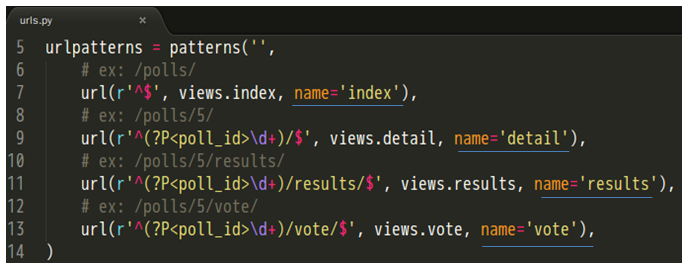
超鏈結部份的網址是寫死的,如果像這樣的鏈結資訊有很多寫死在不同的模版檔案中,將來如果不想使用 polls 這個目錄,那就得記得修改每個模版檔案中的鏈結,還記得在
你可以在模版檔案中,使用
這樣就會對應至 |
相關文章
關於作者


目前為自由工作者,喜好研究程式語言、框架、社群,從中學習設計、典範及文化。閒暇之餘 記錄所學,技術文件涵蓋 C/C++, Java, Ruby/Rails, Python, JavaScript, Haskell 等多個領域,出版電子書 Java SE 6 技術手冊、Java Lambda Tutorial、Java Tutorial、Python Tutorial、Essential JavaScript、Haskell Tutorial。