|
Android 6 Tutorial 第五堂(1)廣播接收元件 – BroadcastReceiver 與 AlarmManager << 前情
Android系統提供一種提示使用者訊息的服務,稱為「通知、Notification」,這是一種Android系統內建的服務,應用程式在需要的時候可以請系統送出一個通知,它會顯示在裝置的狀態列。你可以設定通知的標題、內容和圖示,也可以設定系統發出通知的時候,是否使用震動、音效與閃燈的效果。
Android系統自己就經常使用通知的服務,例如未接來電、未讀取的訊息或應用程式的更新,都會使用通知讓使用者知道有哪一些重要的訊息。Android系統通知API主要是放在「android.app」套件下的「Notification」與「NotificationManager」類別,使用在同樣套件下的「Notification.Builder」類別可以建立需要的通知物件。「Notification.Builder」類別是在Android 3.0(API level 11)加入的,為了提供舊版本的相容性,你應該使用在支援套件中的類別。
16-1 使用通知服務
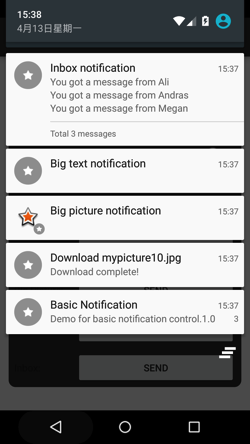
應用程式送出通知以後,系統會在狀態列顯示通知的小圖示。使用者從狀態列向下滑動開啟通知畫面以後,會顯示目前所有通知的詳細資訊,包含通知內容的標題、訊息、圖示和其它內容:
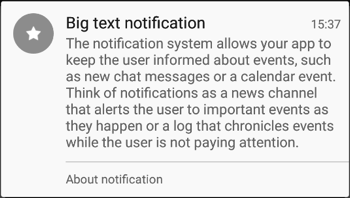
Notification API在Android 4.1(API level 16)加入大型畫面的支援,提供文字、圖片和列表三種畫面,讓通知可以在展開後顯示更多資訊。大型文字的通知畫面可以顯示一段完整內容的文字,如果應用在類似簡訊的通知上,可以讓使用者在通知畫面就閱讀所有簡訊內容:
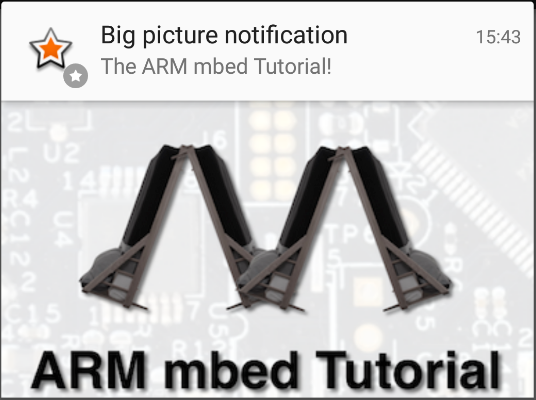
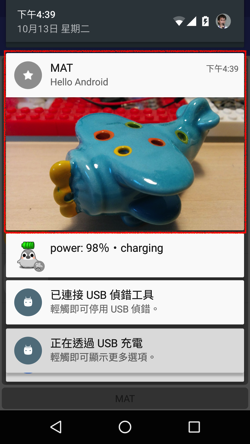
大型圖片的通知畫面可以顯示完整圖片的縮圖,例如應用程式可以讓使用者在通知畫面看到從網際網路下載的圖片,在這裡就可以決定開啟或刪除圖片:
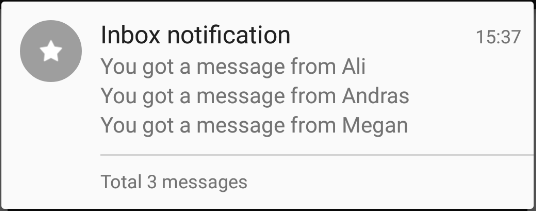
如果應用程式一次接收到比較多的訊息,例如多個簡訊或更新資料,可以使用這種Inbox樣式的通知畫面,把這些資料簡短的說明在通知畫面上列出來讓使用者瀏覽:
16-2 建立與設定通知
建立應用程式需要的通知物件時,使用在Android 3.0(API level 11)加入的「Notification.Builder」類別,為了提供舊版本的相容性,你應該使用在支援套件中的「NotificationCompat.Builder」類別,它宣告在「android.support.v4.app」套件中。在接下來的說明中,如果不是因為使用Android 4.1加入的新功能,都會直接使用它建立需要的通知物件。
一個通知物件可以在建立的時候設定需要的資訊,基本的設定有使用在狀態列的小圖示、通知內容的標題和訊息。你需要先建立好Builder物件,為它設定好需要的資訊後,再呼叫它的「build」方法取得通知物件。下面是宣告在Builder類別中用來設定通知資訊的方法:
- setSmallIcon(int) :指定一個圖形資源設定通知在狀態列上顯示的小圖示,它也會在通知畫面的右下角出現,建議的大小是32×32畫素。
- setLargeIcon(Bitmap) :指定一個Bitmap物件設定通知畫面左側的大圖示,建議的大小是64×64畫素。
- setWhen(long) – 設定發送通知時間,如果要馬上送出通知,可以設定為「System.currentTimeMillis()」。
- setContentTitle(String) :設定通知內容的標題。
- setContentText(String) :設定通知內容的訊息。
- setContentInfo(String) :設定通知內容的額外資訊。
建立好需要的Builder物件後,使用這些方法設定你的通知內容。下面這個程式片段示範建立通知物件的作法:
// 建立大圖示需要的Bitmap物件
Bitmap largeIcon = BitmapFactory.decodeResource(
        getResources(), R.drawable.notify_big_icon);

// 建立NotificationCompat.Builder物件
NotificationCompat.Builder builder =
        new NotificationCompat.Builder(this);

// 設定小圖示、大圖示、狀態列文字、時間、內容標題、內容訊息和內容額外資訊
builder.setSmallIcon(R.drawable.notify_small_icon)
        .setWhen(System.currentTimeMillis())
        .setContentTitle("Basic Notification")
        .setContentText("Demo for basic notification control.")
        .setContentInfo("3");
系統在發出通知的時候,可以讓通知播放音效、發出震動與讓裝置的LED燈閃爍,呼叫Builder類別的「setDefaults」方法執行這些效果的設定。根據應用程式需求,使用Notification類別中宣告的「DEFAULTVIBRATE」、「DEFAULTSOUND」和「DEFAULTLIGHTS」變數,加入震動、音效和閃燈系統預設的效果。如果需要全部效果的話,使用「DEFAULTALL」變數。下面這個程式片段示範使用Switch元件選擇的狀態設定通知效果:
// 建立NotificationCompat.Builder物件
NotificationCompat.Builder builder =
        new NotificationCompat.Builder(this);
// 準備設定通知效果用的變數
int defaults = 0;
// 加入震動效果
if (vibrate_switch.isChecked()) {
    defaults |= Notification.DEFAULT_VIBRATE;
}
// 加入音效效果
if (sound_switch.isChecked()) {
    defaults |= Notification.DEFAULT_SOUND;
}
// 加入閃燈效果
if (flash_switch.isChecked()) {
    defaults |= Notification.DEFAULT_LIGHTS;
}
// 設定通知效果
builder.setDefaults(defaults);
如果需要為通知加入震動的效果,一定要在應用程式設定檔中加入震動的授權設定,否則應用程式會發生錯誤:
<?xml version="1.0" encoding="utf-8"?>
<manifest ... >
    <uses-permission android:name="android.permission.VIBRATE"/>
    <application ... >
        ...
    </application>
</manifest>
16-3 設計特殊的通知效果
系統在發送通知的時候,應用程式可以設定通知需要的效果,包含震動、音效和閃燈,這些都是使用裝置預設的效果,例如通知的音效會使用裝置設定的預設通知音效。你可以根據通知的種類,設計不同的通知效果,例如一個比較重要的通知,可以為它設計比較頻繁的震動頻率和指定特別的通知音效,讓使用者根據通知效果就可以分辨不同的通知。
建立好Builder物件以後,呼叫「setVibrate」、「setSound」和「setLights」方法,可以設定通知的震動、音效和閃燈效果,你可以設定特別的震動和閃燈的頻率,也可以指定閃燈的顏色;通知的音效可以設定為應用程式提供的資源。這些效果也要依照裝置是否提供支援的設備,例如震動和LED指示燈,不同的裝置可能提供不同的LED指示燈的顏色,如果裝置不支援設定的效果,也不會發生錯誤,裝置會自己調整為預設的效果。下面這個程式片段示範為通知設計特別效果的作法:
// 建立NotificationCompat.Builder物件
NotificationCompat.Builder builder =
        new NotificationCompat.Builder(this);

// 設定小圖示、大圖示、狀態列文字、時間和內容標題
builder.setSmallIcon(R.drawable.notify_small_icon)
       .setLargeIcon(largeIcon)
       .setTicker("EFFECT")
       .setWhen(System.currentTimeMillis())
       .setContentTitle("Custom effect");

// 建立震動效果,陣列中元素依序為停止、震動的時間,單位是毫秒
long[] vibrate_effect =
        {1000, 500, 1000, 400, 1000, 300, 1000, 200, 1000, 100};
// 設定震動效果
builder.setVibrate(vibrate_effect);

// 建立音效效果,放在res/raw下的音效檔
Uri sound_effect = Uri.parse(
        "android.resource://" + getPackageName() + "/raw/zeta");
// 設定音效效果
builder.setSound(sound_effect);

// 設定閃燈效果,參數依序為顏色、打開與關閉時間,單位是毫秒
builder.setLights(Color.GREEN, 1000, 1000);

// 建立通知物件
Notification notification = builder.build();
// 使用CUSTOM_EFFECT_ID為編號發出通知
manager.notify(CUSTOM_EFFECT_ID, notification);
16-4 發送與管理通知
建立與設定好需要的Builder物件後,就可以呼叫它的「build」方法取得包含所有設定的「Notification」物件。要發送與管理通知,需要取得系統提供的服務物件,呼叫Activity類別的「getSystemService」方法,參數指定為宣告在「android.content.Context」類別中的「NOTIFICATION_SERVICE」變數,它的回傳型態是「Object」,所以要把它轉型為「NotificationManager」。
NotificationManager物件用來執行發送、更新和清除通知的工作,你需要為應用程式中的通知編一個號碼,這個號碼用來識別通知物件,在更新與清除的時候會用到它。下面這些是宣告在NotificationManager類別中用來管理通知的方法:
- notify(int, Notification) :使用參數指定的編號發出通知,如果這個編號的通知已經存在,就使用通知物件更新原來通知的內容。
- notify(String, int, Notification) :使用參數指定的名稱與編號發出通知,如果這個名稱與編號的通知已經存在,就使用通知物件更新原來通知的內容。
- cancel(int) :清除參數指定編號的通知。
- cancel(String, int) :清除參數指定名稱與編號的通知。
- cancelAll() :清除所有通知。
下面的程式片段示範使用NotificationManager執行物件發送、更新和清除通
知的作法:
// 取得NotificationManager物件
NotificationManager manager = (NotificationManager)
        getSystemService(Context.NOTIFICATION_SERVICE);
// 建立NotificationCompat.Builder物件
NotificationCompat.Builder builder =
        new NotificationCompat.Builder(this);
...
// 建立通知物件
Notification notification = builder.build();
// 使用BASIC_ID為編號發出通知
manager.notify(BASIC_ID, notification);
...
// 建立新的通知物件
Notification notificationNew = builder.build();
// 更新BASIC_ID編號的通知
manager.notify(BASIC_ID, notificationNew);
...
// 清除BASIC_ID編號的通知
manager.cancel(BASIC_ID);
16-5 實作記事題醒通知功能
上一章完成的提醒功能,在設定的時間到了以後,只會顯示記事標題的訊息框,這類的應用應該使用通知會比較合適。因為記事資料可以儲存照片,所以記事通知分為一般文字與照片兩種。如果為記事資料儲存照片的話,在顯示通知的時候就會採用大型圖片的通知畫面:
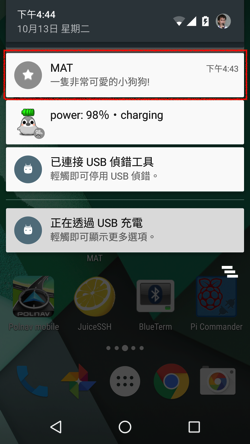
如果是沒有儲存照片的記事資料,在通知的時候就會採用一般的文字畫面:
因為大型圖片的通知從API 16開始支援,開啟「Gradle Scripts」目錄下的「build.gradle(Module:app)」,參考下列的說明,修改「minSdkVersion」最低版本為16,修改後選擇功能表「Tools -> Android -> Sync Project with Gradle Files」:
defaultConfig {
    applicationId "net.macdidi.myandroidtutorial"
    minSdkVersion 16
    targetSdkVersion 23
    versionCode 1
    versionName "1.0"
}
開啟「AlarmReceiver.java」,加入下列的方法宣告:
private void sendNotify(Context context, long id) {
    // 建立資料庫物件
    ItemDAO itemDAO = new ItemDAO(context.getApplicationContext());
    // 讀取指定編號的記事物件
    Item item = itemDAO.get(id);

    // 建立照片檔案物件
    File file = new File(FileUtil.getExternalStorageDir(FileUtil.APP_DIR),
            "P" + item.getFileName() + ".jpg");

    // 是否儲存照片檔案
    boolean isPicture = (item.getFileName() != null &&
            item.getFileName().length() > 0 &&
            file.exists());

    // 取得NotificationManager物件
    NotificationManager nm = (NotificationManager)
            context.getSystemService(Context.NOTIFICATION_SERVICE);

    // 如果有儲存照片檔案
    if (isPicture) {
        // 建立Notification.Builder物件,因為要設定大型圖片樣式
        // 所以不能使用NotificationCompat.Builder
        Notification.Builder builder = new Notification.Builder(context);
        builder.setSmallIcon(android.R.drawable.star_on)
                .setWhen(System.currentTimeMillis())
                .setContentTitle(context.getString(R.string.app_name));

        // 建立大型圖片樣式物件
        Notification.BigPictureStyle bigPictureStyle =
                new Notification.BigPictureStyle();
        // 設定圖片與簡介
        Bitmap bitmap = BitmapFactory.decodeFile(file.getAbsolutePath());
        bigPictureStyle.bigPicture(bitmap)
                       .setSummaryText(item.getTitle());
        // 設定樣式為大型圖片
        builder.setStyle(bigPictureStyle);
        // 發出通知
        nm.notify((int)item.getId(), builder.build());
    }
    // 如果沒有儲存照片檔案
    else {
        // 建立NotificationCompat.Builder物件
        NotificationCompat.Builder builder =
                new NotificationCompat.Builder(context);
        // 設定圖示、時間、內容標題和內容訊息
        builder.setSmallIcon(android.R.drawable.star_big_on)
                .setWhen(System.currentTimeMillis())
                .setContentTitle(context.getString(R.string.app_name))
                .setContentText(item.getTitle());
        // 發出通知
        nm.notify((int)item.getId(), builder.build());
    }
}
同樣在「AlarmReceiver.java」,找到「onReceive」方法,參考下列的程式片段修改原來的程式碼:
@Override
public void onReceive(Context context, Intent intent) {
    // 移除原來的記事標題與訊息框
    // 讀取記事標題
    //String title = intent.getStringExtra("title");
    // 顯示訊息框
    //Toast.makeText(context, title, Toast.LENGTH_LONG).show();

    // 讀取記事編號
    long id = intent.getLongExtra("id", 0);

    if (id != 0) {
        sendNotify(context, id);
    }
}
開啟「InitAlarmReceiver.java」,找到「onReceive」方法,參考下列的程式片段修改原來的程式碼:
@Override
public void onReceive(Context context, Intent intent) {
    ItemDAO itemDAO = new ItemDAO(context.getApplicationContext());
    List<Item> items = itemDAO.getAll();

    long current = Calendar.getInstance().getTimeInMillis();

    AlarmManager am = (AlarmManager)
            context.getSystemService(Context.ALARM_SERVICE);

    for (Item item : items) {
        long alarm = item.getAlarmDatetime();

        if (alarm == 0 || alarm <= current) {
            continue;
        }

        Intent alarmIntent = new Intent(context, AlarmReceiver.class);
        // 移除原來的記事標題資料
        //alarmIntent.putExtra("title", item.getTitle());

        // 加入記事編號資料
        intent.putExtra("id", item.getId());

        PendingIntent pi = PendingIntent.getBroadcast(
                context, (int)item.getId(),
                alarmIntent, PendingIntent.FLAG_ONE_SHOT);
        am.set(AlarmManager.RTC_WAKEUP, item.getAlarmDatetime(), pi);
    }
}
完成這一章所有的功能了,執行應用程式,記得為一個記事資料儲存照片,測試大型圖片通知的功能。
課程相關的檔案都可以GitHub瀏覽與下載。
 http://github.com/macdidi5/Android-6-Tutorial http://github.com/macdidi5/Android-6-Tutorial
後續 >> Android 6 Tutorial 第五堂(3)設計小工具元件 – AppWidget
|  Java 學習之路


becca yu
06/21老師 想請問如果想設定開啟通知後 但希望在2016-06-21-16-00發出通知 請問該怎麼寫??
wbobw951
09/02然後也在MainActivity
// 加入記事編號
intent.putExtra("id", item.getId());
omegawea
03/11InitAlarmReceiver好像有問題:
這句 => Intent.putExtra("id", item.getId());
是不是要改成 => alarmIntent.putExtra("id", item.getId()); ?
但奇怪IDE沒有報錯.