門外漢的 Docker 小試身手
|
在開始之前,如果你還不知道什麼是 Docker,可以先看看官方網站的 Online Tutorial,就能初步瞭解 Docker 的基本作用與操作。 近來由於 Docker 1.0 的釋出,出現了不少 Docker 的新聞或文件,時不時地,Docker 這名詞就會跳到眼前,就如同 對Y Combinator的好奇與挑戰 中因為好奇心而 用 Python 實現 Y Combinator,我也抽空看了一下 Docker 的一些東西。 看完之後覺得還蠻有趣的,輕量級虛擬化、自動建構、有版本控制的環境部署、Docker hub,我就想到找個小目標來挑戰一下…後來想到,用 Docker 來做個 Java Tutorial 的課程環境好像不錯?因為 …
那麼,部署小試的幾個任務就先訂為:
安裝 Docker 與 Pull Image第一個任務主要是按照官方的 Installation 進行,其中介紹了各種作業系統上如何安裝 Docker,我按照的是 Ubuntu Trusty 14.04 (LTS) (64-bit) 中的步驟依序完成安裝,接著直接來個 Hello, World … ~$ sudo docker run ubuntu:12.04 echo 'Hello, World' 要執行 Unable to find image 'ubuntu:12.04' locally Pulling repository ubuntu ebe4be4dd427: Download complete 511136ea3c5a: Download complete 4d289a435341: Download complete 994db1cb2425: Download complete f86a812b1308: Download complete 0b628db0b664: Download complete Hello, World 想要知道現在系統上有哪些 Image,可以執行 ~$ sudo docker images REPOSITORY TAG IMAGE ID CREATED VIRTUAL SIZE ubuntu 12.04 ebe4be4dd427 4 days ago 210.6 MB 你可以使用 容器環境與 commit先來指定 ubuntu:12.04 運行一個容器,執行 ~$ sudo docker run -t -i ubuntu:12.04 bash root@37733a045f92:/# apt-get install wget Reading package lists... Done ... 略 ldconfig deferred processing now taking place root@37733a045f92:/# exit 執行 接下來離開 bash 後,重新執行 如果你想要保存在容器中的變更,必須進行 commit,你可以如上進入 bash、安裝 ~$ sudo docker ps CONTAINER ID IMAGE COMMAND CREATED STATUS PORTS NAMES 30f63c6e8d15 ubuntu:12.04 bash 12 seconds ago Up 12 seconds stoic_nobel 容器 ID 為 30f63c6e8d15,你可以對照一下容器中 bash 的提示,兩個是對應的,想要 commit 變更,在執行 ~$ sudo docker commit -m="Added wget" -a="Justin Lin" 30f63c6e8d15 caterpillar/java-tutorial a721d68a588ab4932a5d9881041bec3fac6c5ae6fc26e0f9c459fa08f8ce4f16 ~$ sudo docker images REPOSITORY TAG IMAGE ID CREATED VIRTUAL SIZE caterpillar/java-tutorial latest a721d68a588a 8 seconds ago 212 MB ubuntu 12.04 ebe4be4dd427 4 days ago 210.6 MB 執行 Push 至 Docker hub在繼續之前,來看看怎麼將你的 Image 放到 Docker hub,你得先在上頭註冊一個帳號,接著回到你的終端機,使用 ~$ sudo docker login Username: caterpillar Password: Email: [email protected] Login Succeeded ~$ sudo docker push caterpillar/java-tutorial The push refers to a repository [caterpillar/java-tutorial] (len: 1) Sending image list Pushing repository caterpillar/java-tutorial (1 tags) 511136ea3c5a: Image already pushed, skipping 4d289a435341: Image already pushed, skipping 994db1cb2425: Image already pushed, skipping f86a812b1308: Image already pushed, skipping 0b628db0b664: Image already pushed, skipping ebe4be4dd427: Image already pushed, skipping a721d68a588a: Image successfully pushed Pushing tag for rev [a721d68a588a] on {http://registry-1.docker.io/v1/repositories/caterpillar/java-tutorial/tags/latest} 注意!請與先前 Pull 時的訊息比較一下,你會發現 Docker 會比對 Hub 上現有的 Image,不會把你 Local 的 Image 整個上傳,上傳的只有變更的部份,也就是 Image ID 為 a721d68a588a 的 caterpillar/java-tutorial。 使用 Dockerfile 自動建構要自己一個一個在容器中部署環境,當然是很麻煩的一件事,你可以在 Dockerfile 中撰寫部署步驟,例如: ~$ mkdir java-tutorial ~$ cd java-tutorial ~/java-tutorial$ touch Dockerfile 依照 Java Tutorial 第一堂(2)準備課程環境 的環境需求,我們在 Dockerfile 中撰寫: FROM caterpillar/java-tutorial MAINTAINER Justin Lin <[email protected]> RUN apt-get -qq update RUN apt-get -qqy install vim # 男子漢就是要用 vim !! RUN apt-get -qqy install unzip RUN apt-get -qqy install git RUN apt-get -qqy install openjdk-7-jdk RUN wget http://services.gradle.org/distributions/gradle-1.7-bin.zip RUN unzip gradle-1.7-bin.zip RUN rm gradle-1.7-bin.zip RUN mv gradle-1.7 /usr/lib RUN ln -s /usr/lib/gradle-1.7/bin/gradle /usr/bin/gradle RUN git clone http://github.com/codedata/JavaTutorial.git 接著執行 ~/java-tutorial$ sudo docker build -t="caterpillar/java-tutorial" . Sending build context to Docker daemon 3.584 kB Sending build context to Docker daemon Step 0 : FROM caterpillar/java-tutorial ---> a721d68a588a Step 1 : MAINTAINER Justin Lin <[email protected]> ---> Using cache ---> 7390f7280de3 Step 2 : RUN apt-get -qq update ---> Running in 93c3f0184d08 ---> df3d14686563 Removing intermediate container 93c3f0184d08 Step 3 : RUN apt-get -qqy install vim # 男子漢就是要用 vim !! ---> Running in a7be275d92fd ...略 別忘了最後有個 提供容器環境變數在上面的建構中,我將 gradle 作了符號連結,這樣就可以不用設定 ~/java-tutorial$ sudo docker run -t -i -e PATH=/usr/lib/gradle-1.7/bin:$PATH caterpillar/java-tutorial bash root@f003d03a9bdd:/# echo $PATH /usr/lib/gradle-1.7/bin:/usr/local/sbin:/usr/local/bin:/usr/sbin:/usr/bin:/sbin:/bin:/usr/games:/usr/local/games root@f003d03a9bdd:/# 根據 Docker.Taipei 中的 討論,上例中, ENV PATH /usr/lib/gradle-1.7/bin:${PATH}
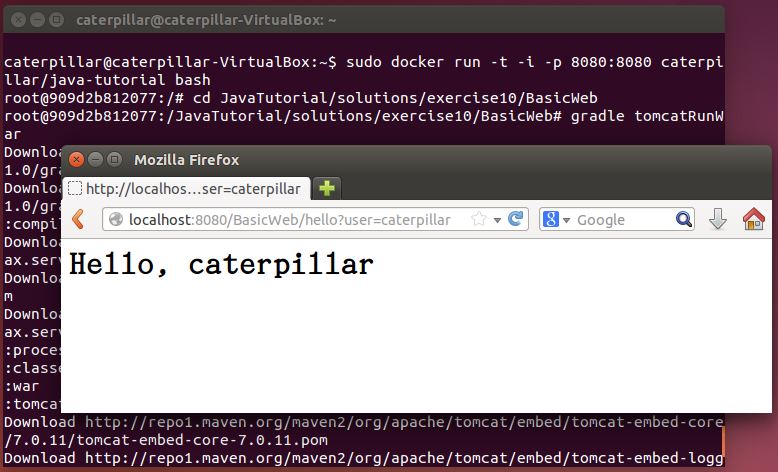
連結容器的 Port 至 Host 的 Port如果你懶得做以上的步驟,可以直接 Pull 我做好的環境: ~$ sudo docker pull caterpillar/java-tutorial 接著執行 這邊使用的方式是,直接將容器的 8080 與 Host 的 8080 連結在一起。例如: ~$ sudo docker run -t -i -p 8080:8080 caterpillar/java-tutorial bash 完成 Java Tutorial 第三堂(3)使用 Servlet、JSP 開發 Web 應用程式 中的練習,使用 Host 的瀏覽器連接 http://localhost:8080/BasicWeb/hello?user=caterpillar,你就可以看到成果了:
|

 Java 學習之路


鄭紹志
10/14好文章!一個小建議:在新的 container 裡,在使用 apt-get install 安裝 wget 前,應該還需要執行 apt-get update,不然會出現 Unable to locate package wget 的訊息...
danielhabook
08/29不好意思,我在安裝vsftp時出現錯誤,可以請教一下嗎?
danielhabook
08/29#apt-get install vsftpd
invoke-rc.d: unknown initscript, /etc/init.d/vsftpd not found.
invoke-rc.d: policy-rc.d denied execution of start.
Error Message
---------------------------------------------------------------------------------------------------------
root@112eedf7452f:/usr/sbin# apt-get install vsftpd
Reading package lists... Done
Building dependency tree
Reading state information... Done
vsftpd is already the newest version.
0 upgraded, 0 newly installed, 0 to remove and 7 not upgraded.
1 not fully installed or removed.
After this operation, 0 B of additional disk space will be used.
Do you want to continue? [Y/n] y
Setting up vsftpd (3.0.2-1ubuntu2.14.04.1) ...
vsftpd user (ftp) already exists, doing nothing.
vsftpd directory (/srv/ftp) already exists, doing nothing.
invoke-rc.d: unknown initscript, /etc/init.d/vsftpd not found.
dpkg: error processing package vsftpd (--configure):
subprocess installed post-installation script returned error exit status 100
Errors were encountered while processing:
vsftpd
E: Sub-process /usr/bin/dpkg returned an error code (1)
danielhabook
08/29環境是Ubuntu 14.04(宿主和容器)